Hey guys. The camera broke and I have no un-boxing video. The items in the tinker crate were...
Ring Magnets X9
4 Piece Wood Frame Set
Notepad
Pencil
Pencil Sharpener
Acrylic Rods X2
Plastic Tube
Metal Cone
Magnet Guide
Mini Rubber bands X4
Sticky foam
Blueprints
Tinker-Zine
THE FIRST MAGNET, MAYBE?
~~~~~~~~~~~~~~~~~~~~~~~~~~~
Have you ever wondered where the first magnet came from? Once upon a time, there was a man named Magnus. One day, when he was keeping an eye on his sheep, his sandal stuck to a rock. Something was keeping the nails in his sandal attached to the rock. That something was magnetism. We don't know if it's true, but its a theory.
MAGNETS AND THEIR USES
~~~~~~~~~~~~~~~~~~~~~~~~~~
Magnet's have many uses. Magnets are used in refrigerators, DVD players, speakers, and more. Roller coasters use magnets too! That's right, roller coasters use magnetism to make the ride really fast. Older ones use gravity. There is a train that uses magnetic levitation (Maglev) to get around really fast. It's all the way in Shanghai. One is being built in Japan, but it won't be completed for another 11 years. NASA is making a rocket sled that goes into space. It has a track like a roller coaster, that uses maglev, and a sled with a shuttle attached to it! The track has to go up the side of a mountain to work. Small models are being tested today, but we don't know what the future has in store.
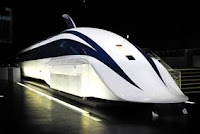 |
| Maglev Train |
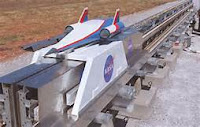 |
| Maglev Sled |
MAGLEV PENCIL HOLDER
~~~~~~~~~~~~~~~~~~~~~~~~
Magnetic Levitation is important, but holding a pencil? It's possible with the items listed below.....
6 Ring Magnets
Wood Frame Pieces
Pencil
Pencil Sharpener
2 Acrylic Rods
Metal Cone
2 Mini Rubber Bands
Sticky Foam Rings and Pads(Grey and Orange)
Before I could start on the main frame, I had to label the magnets first. When all of the magnets were stacked up, I put an orange foam ring with a large hole on top of the top magnet. Then I took a grey foam ring, took the top magnet off the stack, and put the ring on the bottom of that magnet. I repeated with the rest of the magnets, two of the magnets had foam rings with large holes, and the other ones had foam rings with small holes.
When it was time to make the frame, I stuck the foam pads on to the large frame pieces. Then I completed my frame by attaching the large pieces to the long pieces that supported the frame. Taking the 4 magnets with small holes, I slid two magnets on each of the acrylic rods. I attached the rods to the large pieces and adjusted the rods evenly.
The main part was done, but I needed the pencil tube done. I got the metal cone and slid the mini rubber bands on it so when the cone was slid into the end of the straw, it would be firm in place. To make the pencil tube float, I slid the magnets on the tube and positioned them with the magnet guide. All I needed to do was put the tube in between the rods and slide the pencil into the tube.

I hope you enjoyed the post. If you did, please leave a like. I will see you in the next post. Bye guys!
/\/\/\/\/\/\/\/\/\/\/\/\/\/\/\/\/\/\/\/\/\/\/\/\/\/\/\/\/\/\/\/\/\/\/\/\/\/\/\/\/\/\/\/\/\/\/\/\/\/\/\/\/\/\/\/\/\/\/\/\/\/\/\/\/\/\/\/\/\/\/\/\/\
No comments:
Post a Comment