Wednesday, October 28, 2015

Let's Hand it to Hands: Part 1

/\/\/\/\/\/\/\/\/\/\/\/\/\/\/\/\/\/\/\/\/\/\/\/\/\/\/\/\/\/\/\/\/\/\/\/\/\/\/\/\/\/\/\/\/\/\/\/\/\/\/\/\/\/\/\/\/\/\/\/\/\/\/\/\/\/\/\/\/\/\/\/\/\
Hey again guys! In the last post I got a new tinker lab about hands, so today we're going to talk about it. It's really "handy," so handy you don't need a "handyman!" (RIM SHOT!!)

/\/\/\/\/\/\/\/\/\/\/\/\/\/\/\/\/\/\/\/\/\/\/\/\/\/\/\/\/\/\/\/\/\/\/\/\/\/\/\/\/\/\/\/\/\/\/\/\/\/\/\/\/\/\/\/\/\/\/\/\/\/\/\/\/\/\/\/\/\/\/\/\/\

Long ago in caveman times, people thought hands were useless, but they help us create tools and other things. Without them we wouldn't have inventions people have made long ago!
Our hands are made of three different types of bones: the carpal, metacarpal, and the phalanges. The carpal bones are near the wrist. The metacarpal is a bone that connects the phalanges to the carpals. The phalanges are what make up your fingers. All three bones are connected by joints.
 There are two muscles that makes the hand move, one in the forearm the other in the hand. The muscles need to work together with the bones to make the fingers move, that's where tendons come in. Tendons make the muscles and bones work together for the hand to move. Cool huh?

When I started my tinker lab, I went straight to the blueprint for the biomechanical hand. It was pretty easy. First I added finger shaped pieces of foam on the wood palm piece. Then I stuck finger pieces on the sticky foam fingers to make the finger joints. Next, I added eye screws to the medium sized holes in the pieces on the palm side of the hand. The eye screws are for the elastic cord and string.
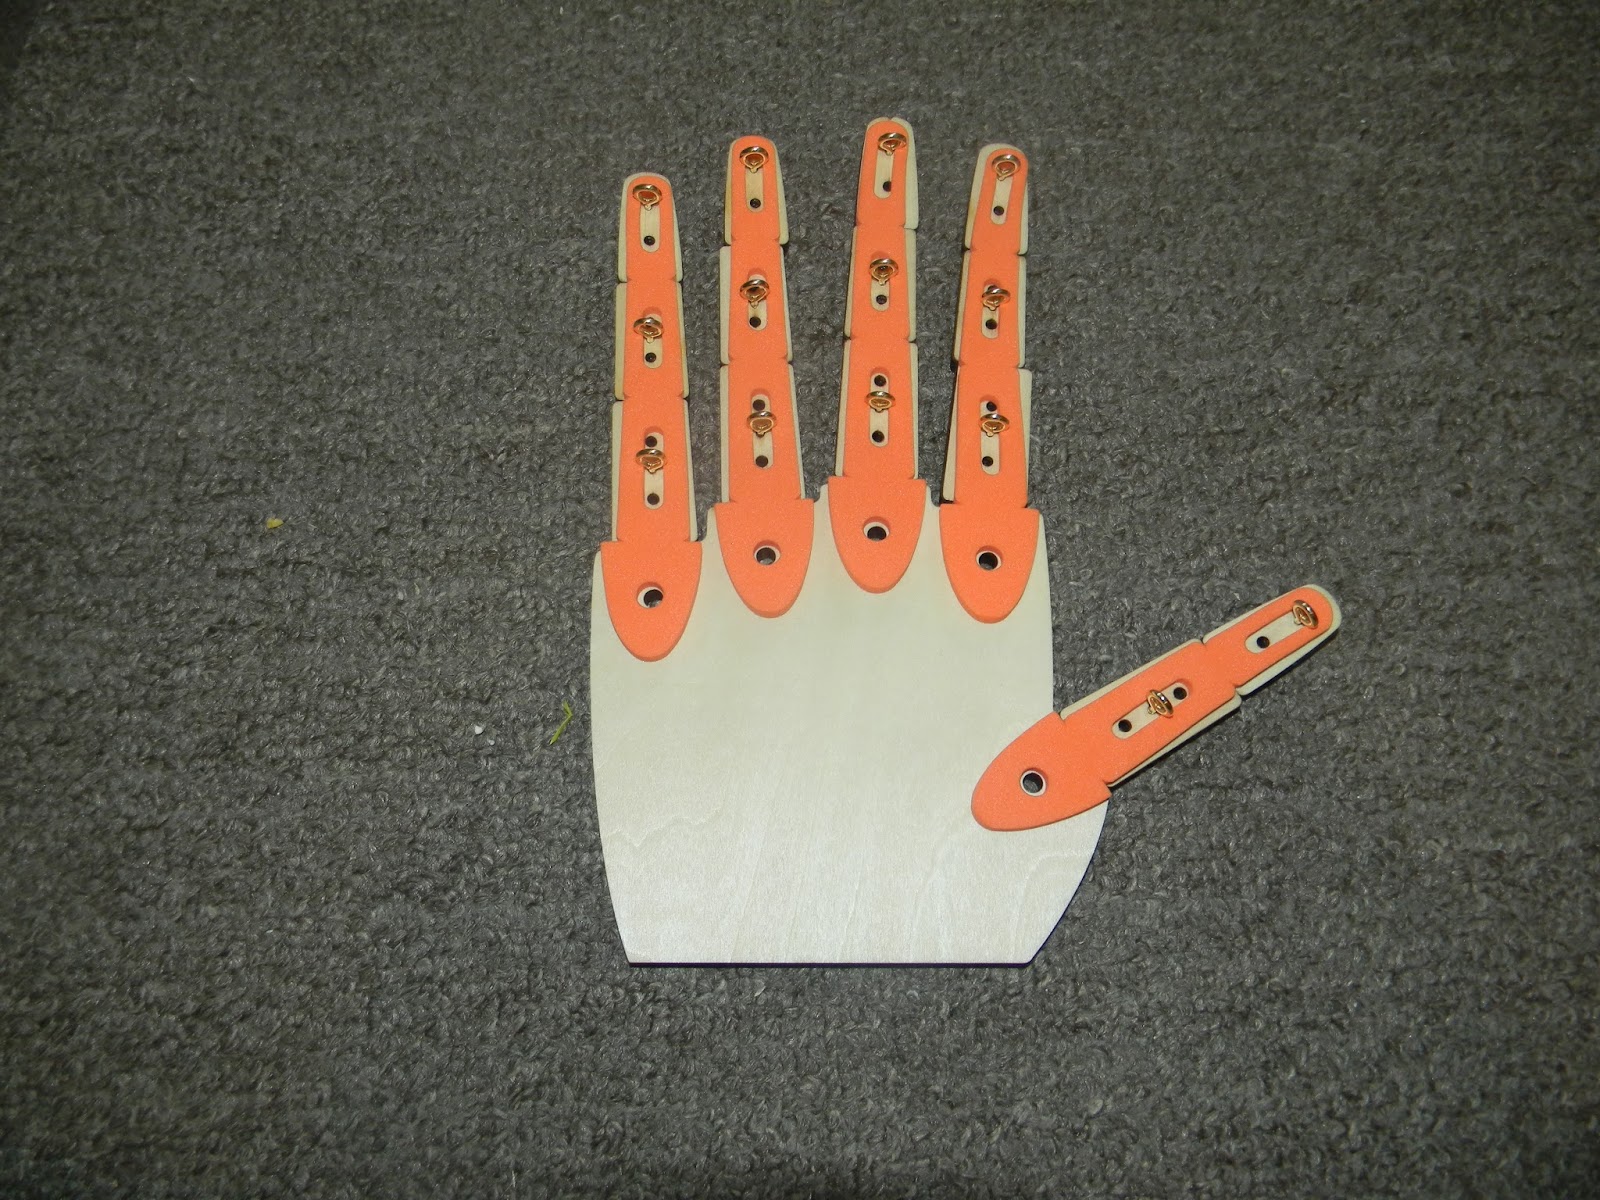
Here is the front.
Here is the back of the hand.


To keep the fingers from flopping forward, I took some elastic cord and knotted it to one of the eye screws on the fingertips.  I threaded it through the holes in the finger pieces (NOT THE EYE SCREWS!!!!) until it got to the hole under the finger on the back of the hand.  I put a brass fastener into the hole and opened it to keep it on the palm. To keep the cord in place, I looped the cord around the fastener.

Making the fingers move was the next task. I started knotting a piece of string onto the same fingertip eye screw.  I let it go through the other eye screws. I let the string go to the bottom of the hand and I tied a loop at the bottom for my finger to go through. I repeated these three steps for the other fingers. It was fun controlling the hand!

I had a bit of trouble with the
string, but it's worth it!

/\/\/\/\/\/\/\/\/\/\/\/\/\/\/\/\/\/\/\/\/\/\/\/\/\/\/\/\/\/\/\/\/\/\/\/\/\/\/\/\/\/\/\/\/\/\/\/\/\/\/\/\/\/\/\/\/\/\/\/\/\/\/\/\/\/\/\/\/\/\/\/\/\

I hope you enjoyed the post, if you did please like comment. In the next post I'll be making some puppets and talking about prosthetic hands. Bye guys! <3
/\/\/\/\/\/\/\/\/\/\/\/\/\/\/\/\/\/\/\/\/\/\/\/\/\/\/\/\/\/\/\/\/\/\/\/\/\/\/\/\/\/\/\/\/\/\/\/\/\/\/\/\/\/\/\/\/\/\/\/\/\/\/\/\/\/\/\/\/\/\/\/\/\

Tuesday, October 20, 2015

My Seventh Tinker Crate

Hey guys! Today I have another unboxing video. I won't tell you much, but here's a hint, it's really "handy." If you want to see the video, just click, tap, smack or however you want to hit the play button.

/\/\/\/\/\/\/\/\/\/\/\/\/\/\/\/\/\/\/\/\/\/\/\/\/\/\/\/\/\/\/\/\/\/\/\/\/\/\/\/\/\/\/\/\/\/\/\/\/\/\/\/\/\/\/\/\/\/\/\/\/\/\/\/\/\/\/\/\/\/\/\/\/\


/\/\/\/\/\/\/\/\/\/\/\/\/\/\/\/\/\/\/\/\/\/\/\/\/\/\/\/\/\/\/\/\/\/\/\/\/\/\/\/\/\/\/\/\/\/\/\/\/\/\/\/\/\/\/\/\/\/\/\/\/\/\/\/\/\/\/\/\/\/\/\/\/\

I hope you liked this post, if you did please like and comment. I will see you in the next post, bye guys! <3

/\/\/\/\/\/\/\/\/\/\/\/\/\/\/\/\/\/\/\/\/\/\/\/\/\/\/\/\/\/\/\/\/\/\/\/\/\/\/\/\/\/\/\/\/\/\/\/\/\/\/\/\/\/\/\/\/\/\/\/\/\/\/\/\/\/\/\/\/\/\/\/\/\

Monday, October 19, 2015

Tinker Lab on Robot Art Part 2

Hey guys!  In the last post, we learned about the drawbot I made. In this post I am talking about my last few projects. They were fun and easy!

/\/\/\/\/\/\/\/\/\/\/\/\/\/\/\/\/\/\/\/\/\/\/\/\/\/\/\/\/\/\/\/\/\/\/\/\/\/\/\/\/\/\/\/\/\/\/\/\/\/\/\/\/\/\/\/\/\/\/\/\/\/\/\/\/\/\/\/\/\/\/\/\/\

 It's pretty cool making art using a drawbot. It's also good making art with just the motor! I got to make art with the motor, the project name is called "Electric Spin Art."

I first took off the motor from the drawbot and evened out the clay. Next, I stuck a piece of tape on the clay. (I had to fold it around to make it sticky on both sides.) Next, I cut out a circle on the last page of the tinker-zine and stuck it to the tape. Last I got some markers, turned the motor on, and started coloring the circle. I had a bit of trouble doing this project, but I had fun doing it. (I think the clay was lop-sided. Oops, silly me! ^_^)

Fail #2
Fail #1


/\/\/\/\/\/\/\/\/\/\/\/\/\/\/\/\/\/\/\/\/\/\/\/\/\/\/\/\/\/\/\/\/\/\/\/\/\/\/\/\/\/\/\/\/\/\/\/\/\/\/\/\/\/\/\/\/\/\/\/\/\/\/\/\/\/\/\/\/\/\/\/\/\

My next 2 projects were called "Crazy Checkerboard" and "Wacky Walk." These projects make it easy to make art and it's easy to do at home.

When I started Crazy Checkerboard, I had to start at the top left corner of the graph paper and color in some squares as I went.(Each line I got through, I switch to another color.) If I get a 1, 2, or 3, I color a square. If I get a 4, 5, or 6, I leave a blank.

I did wacky walk next, it was as easy as crazy checkerboard. Here's a chart for what numbers stand for which move.
----------------------------
1 or 2 =  Go forward
3 = Go right
4 = Go left
5 = Draw a dot
6 = Draw a circle
----------------------------

                  My walk was a really wacky walk, hence the name. It was fun too, I liked it!
Like I said, really wacky walk, it's like a maze!

/\/\/\/\/\/\/\/\/\/\/\/\/\/\/\/\/\/\/\/\/\/\/\/\/\/\/\/\/\/\/\/\/\/\/\/\/\/\/\/\/\/\/\/\/\/\/\/\/\/\/\/\/\/\/\/\/\/\/\/\/\/\/\/\/\/\/\/\/\/\/\/\/\

I hoped you enjoyed this post, if you did please like and comment. I will see you in the next post. Bye guys! <3

/\/\/\/\/\/\/\/\/\/\/\/\/\/\/\|/\/\/\/\/\/\/\/\/\/\/\/\/\/\/\/\/\/\/\/\/\/\/\/\/\/\/\/\/\/\/\/\/\/\/\/\/\/\/\/\/\/\/\/\/\/\/\/\/\/\/\/\/\/\/\/\/\/\

Monday, October 12, 2015

Tinker Lab on Robot Art (Part 1)

Hey guys! Today we're talking about my sixth tinker crate. It is all about robot art. People might not think of technology when they're making art, but artists sometimes use robots to make art.

/\/\/\/\/\/\/\/\/\/\/\/\/\/\/\/\/\/\/\/\/\/\/\/\/\/\/\/\/\/\/\/\/\/\/\/\/\/\/\/\/\/\/\/\/\/\/\/\/\/\/\/\/\/\/\/\/\/\/\/\/\/\/\/\/\/\/\/\/\/\/\/\/\

A cool thing about robot art, is that you don't have control over the robot and what it creates, it does it's own thing, it's called generative art.
The first project was called "Wind-up toy Painting." I didn't have a wind-up toy, so I went to straight to the blueprint. This is my favorite part of the entire kit. I got to make a drawbot!

Pic 1: The drawbot fully assembled. Awesome!


 I had to connect a motor, but I needed to prep it first by attaching wires to it. After the prepping, I added a gear to the end of a motor. Next, I connected the motor to a battery pack. Then I placed the batteries in the pack. The motor was finished, but I needed to make the bot body next.
 First I had to cut loop fastener and stick it to the white lines on the bot base. The loop fastener is half of a Velcro for the bot. Then I stuck on sticky foam donuts (YUM! Not!) on the donut mark on the bot base. Next, I stuck markers in the donuts with the marker caps under the bot. Last, I put tiny rubber bands around the markers under the bot. With the body done, I needed to connect the motor to the bot body.

First I added a hook fastener to the bottom of the battery pack and motor. Next I put them on the loop fastener on the bot (Pic 1). Last I stuck a piece of clay to the gear at the end of the motor. That helps the bot wobble to make it draw. All I had to do was turn it on and see what happens. Here's a video about the drawbot! ^_^


/\/\/\/\/\/\/\/\/\/\/\/\/\/\/\/\/\/\/\/\/\/\/\/\/\/\/\/\/\/\/\/\/\/\/\/\/\/\/\/\/\/\/\/\/\/\/\/\/\/\/\/\/\/\/\/\/\/\/\/\/\/\/\/\/\/\/\/\/\/\/\/\/\

I hope you liked the post. If you did, please like and comment. I will see you in the next post. Bye guys!

/\/\/\/\/\/\/\/\/\/\/\/\/\/\/\/\/\/\/\/\/\/\/\/\/\/\/\/\/\/\/\/\/\/\/\/\/\/\/\/\/\/\/\/\/\/\/\/\/\/\/\/\/\/\/\/\/\/\/\/\/\/\/\/\/\/\/\/\/\/\/\/\/\

Tuesday, October 6, 2015

My Geography Project

Hey guys! Today I want to talk about a geography project I'm working on. It's all about marking down famous North American deserts, wetlands, grasslands, and mountains.

/\/\/\/\/\/\/\/\/\/\/\/\/\/\/\/\/\/\/\/\/\/\/\/\/\/\/\/\/\/\/\/\/\/\/\/\/\/\/\/\/\/\/\/\/\/\/\/\/\/\/\/\/\/\/\/\/\/\/\/\/\/\/\/\/\/\/\/\/\/\/\/\/\

Right now I've marked down 4 deserts. I first had to look up a desert on my tablet, let's say a really hot desert, like Death valley. Then I had to look for the location to see where it is and if it was in North America. Last, I take a piece of paper and cut out a tiny rectangle, write down the desert and pin the paper to a map where it's located with a tack. But something I did for fun, I took a cu-tip and paint the top of the tack yellow. I've marked down Death Valley, the Great Basin, Mojave, and the Sonoran. Here's a chart for which colors are which. WAIT! I have a joke! Knock knock! Who's there? Ghost. Ghost who? Go stick your head in a bucket of water! (Sorry, wanted to have a joke for Halloween! ^_^ )

------------------------
Yellow = Desert
Blue = Wetland
Green = Grassland
Brown = Mountain
------------------------

FUN FACT: People went to Death Valley and set up a gold mine there. But it didn't work out, many people died there. That's how it got the name, Death Valley. (BUM, BUM, BUM!)

/\/\/\/\/\/\/\/\/\/\/\/\/\/\/\/\/\/\/\/\/\/\/\/\/\/\/\/\/\/\/\/\/\/\/\/\/\/\/\/\/\/\/\/\/\/\/\/\/\/\/\/\/\/\/\/\/\/\/\/\/\/\/\/\/\/\/\/\/\/\/\/\/\

I hope you enjoyed the post, please like and comment. But I have another joke! What is a astronauts favorite candy? I will leave it to you in the comments. I'll see you in the next post. Bye Guys! <3

/\/\/\/\/\/\/\/\/\/\/\/\/\/\/\/\/\/\/\/\/\/\/\/\/\/\/\/\/\/\/\/\/\/\/\/\/\/\/\/\/\/\/\/\/\/\/\/\/\/\/\/\/\/\/\/\/\/\/\/\/\/\/\/\/\/\/\/\/\/\/\/\/\

My Sixth Tinker Lab

Hey again! Today I have a new unboxing video for my sixth tinker lab. I also want to say that the post for soda science part 2 isn't coming out yet. That's because I don't have all of the ingredients for the fizzy treat. But here is the video for my sixth tinker crate! :-)

 What will it be? What will it be? Just watch the video and go and see!

/\/\/\/\/\/\/\/\/\/\/\/\/\/\/\/\/\/\/\/\/\/\/\/\/\/\/\/\/\/\/\/\/\/\/\/\/\/\/\/\/\/\/\/\/\/\/\/\/\/\/\/\/\/\/\/\/\/\/\/\/\/\/\/\/\/\/\/\/\/\/\/\/\


/\/\/\/\/\/\/\/\/\/\/\/\/\/\/\/\/\/\/\/\/\/\/\/\/\/\/\/\/\/\/\/\/\/\/\/\/\/\/\/\/\/\/\/\/\/\/\/\/\/\/\/\/\/\/\/\/\/\/\/\/\/\/\/\/\/\/\/\/\/\/\/\/\

I hope you enjoyed the video, please like and comment and I'll see you all in the next post. Bye guys!

P.S, I hope you don't get to impatient for part 2 on soda science. ^_^ <3

/\/\/\/\/\/\/\/\/\/\/\/\/\/\/\/\/\/\/\/\/\/\/\/\/\/\/\/\/\/\/\/\/\/\/\/\/\/\/\/\/\/\/\/\/\/\/\/\/\/\/\/\/\/\/\/\/\/\/\/\/\/\/\/\/\/\/\/\/\/\/\/\/\