Thursday, December 31, 2015

Making Electricity: Part 2

/\/\/\/\/\/\/\/\/\/\/\/\/\/\/\/\/\/\/\/\/\/\/\/\/\/\/\/\/\/\/\/\/\/\/\/\/\/\/\/\/\/\/\/\/\/\/\/\/\/\/\/\/\/\/\/\/\/\/\/\/\/\/\/\/\/\/\/\/\/\/\/\/\

Hello again guys! Today I'm going to show how I made my hand crank flashlight.

First, I want to talk about the breadboard. The breadboard is for connecting circuits with wires and diodes and other things. If you wanted to connect a light and wire together in line 1, put them both in line 1 in any of the 5 holes. There are at least 7 vertical lines in the breadboard. The breadboard is very important for the flashlight.
This is the breadboard. Each 5 holes
in a vertical line is connected together.

I had to attach one red and one black wire to a motor. Then I attached the red wire to line 1 and the black wire to line 7 in the breadboard. I had to do the same thing with another red wire and black wire. I connected the other two wires not attached to the motor to an LED light. For the crank, I slid a binding post through a plastic part of the crank. I also slid a rubber ring and rubber cap onto the binding post to make the handle for the crank. To make the flashlight work, I attached the crank to the motor shaft.

I didn't get to make the outside of the flashlight yet. I had to make the circuit work for two LED's. I moved the red wire connected to the LED from line 1 to line 6. Then I connected a resistor to line 3 and line 6. I took my diode and connected it to line 1 and line 3. I had to test the circuit before I added the capacitor. Then I connected the capacitor to line 3 and line 7.
To have two LED's, I removed the black wire from the LED and connected it to a second LED. I also attached a yellow wire to both the LED's. THE CIRUIT IS COMPLETE!! All I had to do was attach the circuit to the flashlight box, close it, and test the flashlight.


In order to have the crank outside the flashlight box, I took off the crank and stuck the motor shaft into the large round hole in the box. The tabs lined up with the small round holes and attached the tabs on the box with brads. To make the crank better, I took a sticky foam circle and attached it to the side of the crank with the handle. I also attached another sticky foam circle, this time with a slit, to the other side. Flipping the box over, I attached the crank back on the motor shaft. Adding two sticky foam strips on the bottom of the breadboard, I flipped the box over and stuck it on the box so the pegs were in the holes above the window.


Right next to where the breadboard is, there were slits for the LED's. I took the LED's from the wires, put them in the slits on the box, and reattached them to the wires. Bringing the bottom panel up, I attached a hook Velcro strap to the top panel and a loop strap to the bottom panel. Folding the top panel inwards, I attached them together and folded the rest of the flaps in. The last thing I did was put a tinker lab sticker on it to keep the handle from hitting the box. THE FLASHLIGHT WAS DONE!!! It's way better than my stemist kit flashlight!

Here is my flashlight in all of it's
glory! Cool, huh?
/\/\/\/\/\/\/\/\/\/\/\/\/\/\/\/\/\/\/\/\/\/\/\/\/\/\/\/\/\/\/\/\/\/\/\/\/\/\/\/\/\/\/\/\/\/\/\/\/\/\/\/\/\/\/\/\/\/\/\/\/\/\/\/\/\/\/\/\/\/\/\/\/\

I hope you liked the post about my flashlight. Please like and comment if you liked the flashlight! See you in the next post. Bye guys! <3
/\/\/\/\/\/\/\/\/\/\/\/\/\/\/\/\/\/\/\/\/\/\/\/\/\/\/\/\/\/\/\/\/\/\/\/\/\/\/\/\/\/\/\/\/\/\/\/\/\/\/\/\/\/\/\/\/\/\/\/\/\/\/\/\/\/\/\/\/\/\/\/\/\

Monday, December 14, 2015

Making Electricity: Part 1 (The Current War)

/\/\/\/\/\/\/\/\/\/\/\/\/\/\/\/\/\/\/\/\/\/\/\/\/\/\/\/\/\/\/\/\/\/\/\/\/\/\/\/\/\/\/\/\/\/\/\/\/\/\/\/\/\/\/\/\/\/\/\/\/\/\/\/\/\/\/\/\/\/\/\/\/\
Hey again!

/\/\/\/\/\/\/\/\/\/\/\/\/\/\/\/\/\/\/\/\/\/\/\/\/\/\/\/\/\/\/\/\/\/\/\/\/\/\/\/\/\/\/\/\/\/\/\/\/\/\/\/\/\/\/\/\/\/\/\/\/\/\/\/\/\/\/\/\/\/\/\/\/\

Let's talk about something that people known throughout electricity history! You know what it is?
THE BATTLE OF THE CURRENTS!!!!!! Nicola Tesla VS. Thomas Edison! Who will win the battle?


Here is some history about how the battle started.
Thomas Edison was known for creating the light-bulb. He also made a power system. He created Americas first direct current (DC) power plant in New York City in 1882.

 At the time, people thought that electricity was scary. Edison decided to make something to make people see that is wasn't scary. He hired somebody to tap-dance on an electrified floor. When the dancer touched the floor, the light-bulb hat on his head lit up!

In 1884, Nicola Tesla came to New York. He asked Edison if he could improve his design. Edison said he would give him 50,000 dollars (That's a million in today's money.) if he was successful. A few months later, Tesla finished the improvements he promised. Instead of giving Tesla the money, Edison just said "Tesla, you don't understand our American humor." It was all a joke! Instead, he offered 10 dollars a week in his salary, but Tesla was so furious, he quit his job.

Edison's popularity grew as he gained more and more customers, but there was a problem with the system. If you were within range of the power plant, you would have had enough power for your house. DC loses power over long distances. If you live in a house a little more than a mile away from the plant, you wouldn't have enough power for an electric toothbrush!! (Too bad there were no electric toothbrushes back then.)

Nicola Tesla decided to take on DC. How did he do it? WITH ALTERNATING CURRENT!!!!
Instead of flowing in one direction like DC, the current alternates in zigzags(Hence the name AC.).
In 1888, Tesla invented and patented an AC motor and power system. The WEMC (Westinghouse Electric and Manufacturing Company) hired Tesla to make AC motors. AWESOME!!!
That wasn't good for Edison, so he decided to make up  rumors about bad accidents with AC. He even told people to use word "Westinghoused" instead of "electrocuted." The worst part was, he shocked stray dogs and cats with AC to show how dangerous it was too! (HE'S A BIG, BIG JERK!!!!)
He was kind of right about how dangerous it was. He was wrong about one thing. When AC reaches a home to power it, it's safe to use.

Alternating current didn't have much popularity, but the advantages were hard to ignore. 5 years later, Tesla's AC system beat Edison's DC system. Tesla made a power plant at Niagara Falls that made AC power. It was the first plant that used water to create electricity. was worth tons of money to build the power plant. In 1896, Tesla flipped the switch and the plant was powered! Years after, people were using AC in New York for years! AC WON THE BATTLE OF THE CURRENTS!!!!

AC may have won the battle of the currents, but we use AC and DC power everyday. Any electronic devices use DC. Computers, TV's, and other things have AC adapters in them to turn AC into DC to work. After the battle of the currents, Edison and Tesla never worked together again. They were both geniuses everyone will remember.

/\/\/\/\/\/\/\/\/\/\/\/\/\/\/\/\/\/\/\/\/\/\/\/\/\/\/\/\/\/\/\/\/\/\/\/\/\/\/\/\/\/\/\/\/\/\/\/\/\/\/\/\/\/\/\/\/\/\/\/\/\/\/\/\/\/\/\/\/\/\/\/\/\

I hope you enjoyed this post. If you did please like and comment. In the next post I'll be talking about my hand-crank flashlight. Bye guys! <3 ^_^
/\/\/\/\/\/\/\/\/\/\/\/\/\/\/\/\/\/\/\/\/\/\/\/\/\/\/\/\/\/\/\/\/\/\/\/\/\/\/\/\/\/\/\/\/\/\/\/\/\/\/\/\/\/\/\/\/\/\/\/\/\/\/\/\/\/\/\/\/\/\/\/\/\

Thursday, December 3, 2015

8th Tinker Lab

/\/\/\/\/\/\/\/\/\/\/\/\/\/\/\/\/\/\/\/\/\/\/\/\/\/\/\/\/\/\/\/\/\/\/\/\/\/\/\/\/\/\/\/\/\/\/\/\/\/\/\/\/\/\/\/\/\/\/\/\/\/\/\/\/\/\/\/\/\/\/\/\/\
Hey again guys! Today I have a new Tinker Lab about making electricity! I hope you enjoy the video!

/\/\/\/\/\/\/\/\/\/\/\/\/\/\/\/\/\/\/\/\/\/\/\/\/\/\/\/\/\/\/\/\/\/\/\/\/\/\/\/\/\/\/\/\/\/\/\/\/\/\/\/\/\/\/\/\/\/\/\/\/\/\/\/\/\/\/\/\/\/\/\/\/\


/\/\/\/\/\/\/\/\/\/\/\/\/\/\/\/\/\/\/\/\/\/\/\/\/\/\/\/\/\/\/\/\/\/\/\/\/\/\/\/\/\/\/\/\/\/\/\/\/\/\/\/\/\/\/\/\/\/\/\/\/\/\/\/\/\/\/\/\/\/\/\/\/\

I hope you enjoyed the video. If you did please like and comment. Bye guys!
/\/\/\/\/\/\/\/\/\/\/\/\/\/\/\/\/\/\/\/\/\/\/\/\/\/\/\/\/\/\/\/\/\/\/\/\/\/\/\/\/\/\/\/\/\/\/\/\/\/\/\/\/\/\/\/\/\/\/\/\/\/\/\/\/\/\/\/\/\/\/\/\/\

Wednesday, December 2, 2015

Let's Hand it to Hands: Part 3

/\/\/\/\/\/\/\/\/\/\/\/\/\/\/\/\/\/\/\/\/\/\/\/\/\/\/\/\/\/\/\/\/\/\/\/\/\/\/\/\/\/\/\/\/\/\/\/\/\/\/\/\/\/\/\/\/\/\/\/\/\/\/\/\/\/\/\/\/\/\/\/\/\
Hey again guys! Today I'll be talking about e-NABLE and my last project. REMINDER: Whoever guessed "A brain-controlled hand" on the question is right. Good job!!!!

/\/\/\/\/\/\/\/\/\/\/\/\/\/\/\/\/\/\/\/\/\/\/\/\/\/\/\/\/\/\/\/\/\/\/\/\/\/\/\/\/\/\/\/\/\/\/\/\/\/\/\/\/\/\/\/\/\/\/\/\/\/\/\/\/\/\/\/\/\/\/\/\/\

In the last post, we left off with a big question: What will happen when Liam grows bigger?

 His fingers would be too small for him when he grows.
This was a big problem for Liam. That's when Ivan got an amazing idea! He could make a bigger design of Liam's hand, turn it into a digital file, and feed it into a 3D printer. A 3D printer scans digital files and it prints three dimensional pieces that the file had on it. Ivan had to add strings to the hand, that's so person can move their wrist to pull the strings! As soon as he put the hand together, he gave the hand to Liam. The hand that Ivan made had worked! YAY!!! With that digital file, they could help even more kids around the world. They soon decided to share their hand design online, for free! Everybody that saw the design wanted to help. The design was used over and over again for kids around the world.

This is the design for the e-NABLE hand. Whenever
a person flexes their wrist, it pulls the strings.
I think e-NABLE also makes prosthetic fingers too.
Did you know that you can have a hand designed
a certain way? This was designed for a kid
who loved Captain America! I wonder if
they have Minecraft hands? ^_^


/\/\/\/\/\/\/\/\/\/\/\/\/\/\/\/\/\/\/\/\/\/\/\/\/\/\/\/\/\/\/\/\/\/\/\/\/\/\/\/\/\/\/\/\/\/\/\/\/\/\/\/\/\/\/\/\/\/\/\/\/\/\/\/\/\/\/\/\/\/\/\/\/\

The last project that I did was called "Try a Touch Test."

I had to tape two pencils together at even length. Then I ran two tests, one on Aidan and the other on Mom. I gently touched their fingertips with the pencils. They felt two pencil tips. I gently touched them with the pencils, this time on the arm. Interestingly, they only felt one tip.
What is going on? Recepters!!! They send a signal to your brain saying you touched something. The recepters are close together on your fingers. On your arm, they are much farther apart. Cool huh?

/\/\/\/\/\/\/\/\/\/\/\/\/\/\/\/\/\/\/\/\/\/\/\/\/\/\/\/\/\/\/\/\/\/\/\/\/\/\/\/\/\/\/\/\/\/\/\/\/\/\/\/\/\/\/\/\/\/\/\/\/\/\/\/\/\/\/\/\/\/\/\/\/\

I hope you enjoyed this post. If you did, please like and comment. In the next post, I will have a new Tinker Crate. Bye guys! <3
/\/\/\/\/\/\/\/\/\/\/\/\/\/\/\/\/\/\/\/\/\/\/\/\/\/\/\/\/\/\/\/\/\/\/\/\/\/\/\/\/\/\/\/\/\/\/\/\/\/\/\/\/\/\/\/\/\/\/\/\/\/\/\/\/\/\/\/\/\/\/\/\/\

Tuesday, November 10, 2015

Let's Hand it to Hands: Part 2

/\/\/\/\/\/\/\/\/\/\/\/\/\/\/\/\/\/\/\/\/\/\/\/\/\/\/\/\/\/\/\/\/\/\/\/\/\/\/\/\/\/\/\/\/\/\/\/\/\/\/\/\/\/\/\/\/\/\/\/\/\/\/\/\/\/\/\/\/\/\/\/\/\
Hey guys, in this post I'll be talking about prosthetic hands and finger puppets I have made. First, a joke. What is a hands favorite place to go in the world? Hawaii! That's because hands like to sit under PALM TREES!!!! (RIM SHOT!)

/\/\/\/\/\/\/\/\/\/\/\/\/\/\/\/\/\/\/\/\/\/\/\/\/\/\/\/\/\/\/\/\/\/\/\/\/\/\/\/\/\/\/\/\/\/\/\/\/\/\/\/\/\/\/\/\/\/\/\/\/\/\/\/\/\/\/\/\/\/\/\/\/\

I'll first be talking about prosthetic arms and hands. The first prosthetic arm wasn't really prosthetic, that's because people in old times didn't have the parts to make it move. The first arm was made for a Roman general named Marcus Sergius, who used the iron arm around 200-100 BCE. Around 1564, a French military doctor named Ambroise Pare created a useable prosthetic arm with catches and springs acting like joints. He gave one to a soldier to grip the reigns of his horse. It was so successful that he continued making arms for many people with missing limbs.


Picture of Ambroise
Pare's hand.
Around 1904, a prosthetic arm was made for a pianist who lost her arm. (Her name is unknown.)It was made with a wide finger spread so the person wearing it can span an octave on a piano. The hand also had pads on the tips of the fingers to make the sound it made on the keys quieter. The woman got to play a piano concert in London at the Royal Albert Hall in 1906 with that arm! Awesome, huh? Right now, the United States Food and Drug Administration have a program for making innovative medical devices.
 Guess what it is, is it...

A. A hand that can pick up a anvil
B. A arm for climbing really high
C. A leg for super speed
D. A brain-controlled hand

Leave your answer in the comments, I'll be checking them.


/\/\/\/\/\/\/\/\/\/\/\/\/\/\/\/\/\/\/\/\/\/\/\/\/\/\/\/\/\/\/\/\/\/\/\/\/\/\/\/\/\/\/\/\/\/\/\/\/\/\/\/\/\/\/\/\/\/\/\/\/\/\/\/\/\/\/\/\/\/\/\/\/\

After the handy history, I went to one of my projects. My first project was called "Straw Puppets."

The first thing I did was make the puppet joints. I took some scissors and cut a diamond shape in the straw, I had to do this about 5 times for the snail, 1 time for the squid arms, and 2 times for the bee. I then cut a piece of string, threaded it through the straw to the other end, and taped it. To make sure it worked, I had to pull the string to see if it bent. I had to do the same thing to the other yellow straw to make the eye stalks.

To make the snail, I had to attach tape the snail shell to the body and the eyes to the eye stalks. I taped the stalks to the body, and let the string through the bottom of the body. If you pull the string, it'll make the eyes move! Cool huh? I had to make the sea monster and the bee too. The puppets were fun! ^_^

If you pull the strings, it makes
the monster attack the ship.
If you pull the string, it makes
the bee land on the flower.


The snail is one of my favorite
puppets.
 
Interestingly, the word "puppet" comes from a Greek word for "string" or "tendon." The puppet joints resemble finger joints. The string acts like a tendon to make the puppet joints move, kind of like the biomechanical hand.


/\/\/\/\/\/\/\/\/\/\/\/\/\/\/\/\/\/\/\/\/\/\/\/\/\/\/\/\/\/\/\/\/\/\/\/\/\/\/\/\/\/\/\/\/\/\/\/\/\/\/\/\/\/\/\/\/\/\/\/\/\/\/\/\/\/\/\/\/\/\/\/\/\
 
 Now let's talk more about prosthetic hands. Once in a while they can get pretty expensive. Sometimes people need prosthetics, but they can't afford to get one. How can you make sure that kids have prosthetic hands they can afford? Luckily, there's a volunteer organization online called e-NABLE that can help. How it all started was with a video made by Ivan Owen. He had made a mechanical puppet hand and made a video with it. It was a big hit on youtube.
Ivan Owen's puppet hand.
A South African carpenter named Richard Van As saw the video and asked Ivan for help because he lost some of his fingers in an accident. The two worked together to make some fingers. The fingers that they made worked! Richard could hold his tools again! A mother of a 5-year-old named Liam saw the fingers they have made and asked if they could make some fingers for her son, they said yes! After they made some fingers, Liam could pick up a ball with his right hand for the first time! There is one problem. What will happen when Liam grows bigger? In the next post we can talk more about e-NABLE.
 
/\/\/\/\/\/\/\/\/\/\/\/\/\/\/\/\/\/\/\/\/\/\/\/\/\/\/\/\/\/\/\/\/\/\/\/\/\/\/\/\/\/\/\/\/\/\/\/\/\/\/\/\/\/\/\/\/\/\/\/\/\/\/\/\/\/\/\/\/\/\/\/\/\
 
 I hope you enjoyed this post, if you did please like and comment. In the next post I'll talk more about prosthetic hands. Bye guys! <3
/\/\/\/\/\/\/\/\/\/\/\/\/\/\/\/\/\/\/\/\/\/\/\/\/\/\/\/\/\/\/\/\/\/\/\/\/\/\/\/\/\/\/\/\/\/\/\/\/\/\/\/\/\/\/\/\/\/\/\/\/\/\/\/\/\/\/\/\/\/\/\/\/\

Wednesday, October 28, 2015

Let's Hand it to Hands: Part 1

/\/\/\/\/\/\/\/\/\/\/\/\/\/\/\/\/\/\/\/\/\/\/\/\/\/\/\/\/\/\/\/\/\/\/\/\/\/\/\/\/\/\/\/\/\/\/\/\/\/\/\/\/\/\/\/\/\/\/\/\/\/\/\/\/\/\/\/\/\/\/\/\/\
Hey again guys! In the last post I got a new tinker lab about hands, so today we're going to talk about it. It's really "handy," so handy you don't need a "handyman!" (RIM SHOT!!)

/\/\/\/\/\/\/\/\/\/\/\/\/\/\/\/\/\/\/\/\/\/\/\/\/\/\/\/\/\/\/\/\/\/\/\/\/\/\/\/\/\/\/\/\/\/\/\/\/\/\/\/\/\/\/\/\/\/\/\/\/\/\/\/\/\/\/\/\/\/\/\/\/\

Long ago in caveman times, people thought hands were useless, but they help us create tools and other things. Without them we wouldn't have inventions people have made long ago!
Our hands are made of three different types of bones: the carpal, metacarpal, and the phalanges. The carpal bones are near the wrist. The metacarpal is a bone that connects the phalanges to the carpals. The phalanges are what make up your fingers. All three bones are connected by joints.
 There are two muscles that makes the hand move, one in the forearm the other in the hand. The muscles need to work together with the bones to make the fingers move, that's where tendons come in. Tendons make the muscles and bones work together for the hand to move. Cool huh?

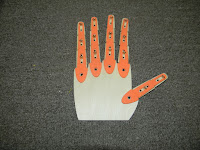
When I started my tinker lab, I went straight to the blueprint for the biomechanical hand. It was pretty easy. First I added finger shaped pieces of foam on the wood palm piece. Then I stuck finger pieces on the sticky foam fingers to make the finger joints. Next, I added eye screws to the medium sized holes in the pieces on the palm side of the hand. The eye screws are for the elastic cord and string.
Here is the front.
Here is the back of the hand.


To keep the fingers from flopping forward, I took some elastic cord and knotted it to one of the eye screws on the fingertips.  I threaded it through the holes in the finger pieces (NOT THE EYE SCREWS!!!!) until it got to the hole under the finger on the back of the hand.  I put a brass fastener into the hole and opened it to keep it on the palm. To keep the cord in place, I looped the cord around the fastener.

Making the fingers move was the next task. I started knotting a piece of string onto the same fingertip eye screw.  I let it go through the other eye screws. I let the string go to the bottom of the hand and I tied a loop at the bottom for my finger to go through. I repeated these three steps for the other fingers. It was fun controlling the hand!

I had a bit of trouble with the
string, but it's worth it!

/\/\/\/\/\/\/\/\/\/\/\/\/\/\/\/\/\/\/\/\/\/\/\/\/\/\/\/\/\/\/\/\/\/\/\/\/\/\/\/\/\/\/\/\/\/\/\/\/\/\/\/\/\/\/\/\/\/\/\/\/\/\/\/\/\/\/\/\/\/\/\/\/\

I hope you enjoyed the post, if you did please like comment. In the next post I'll be making some puppets and talking about prosthetic hands. Bye guys! <3
/\/\/\/\/\/\/\/\/\/\/\/\/\/\/\/\/\/\/\/\/\/\/\/\/\/\/\/\/\/\/\/\/\/\/\/\/\/\/\/\/\/\/\/\/\/\/\/\/\/\/\/\/\/\/\/\/\/\/\/\/\/\/\/\/\/\/\/\/\/\/\/\/\

Tuesday, October 20, 2015

My Seventh Tinker Crate

Hey guys! Today I have another unboxing video. I won't tell you much, but here's a hint, it's really "handy." If you want to see the video, just click, tap, smack or however you want to hit the play button.

/\/\/\/\/\/\/\/\/\/\/\/\/\/\/\/\/\/\/\/\/\/\/\/\/\/\/\/\/\/\/\/\/\/\/\/\/\/\/\/\/\/\/\/\/\/\/\/\/\/\/\/\/\/\/\/\/\/\/\/\/\/\/\/\/\/\/\/\/\/\/\/\/\


/\/\/\/\/\/\/\/\/\/\/\/\/\/\/\/\/\/\/\/\/\/\/\/\/\/\/\/\/\/\/\/\/\/\/\/\/\/\/\/\/\/\/\/\/\/\/\/\/\/\/\/\/\/\/\/\/\/\/\/\/\/\/\/\/\/\/\/\/\/\/\/\/\

I hope you liked this post, if you did please like and comment. I will see you in the next post, bye guys! <3

/\/\/\/\/\/\/\/\/\/\/\/\/\/\/\/\/\/\/\/\/\/\/\/\/\/\/\/\/\/\/\/\/\/\/\/\/\/\/\/\/\/\/\/\/\/\/\/\/\/\/\/\/\/\/\/\/\/\/\/\/\/\/\/\/\/\/\/\/\/\/\/\/\