Wednesday, August 10, 2016

15th Tinker Crate

/\/\/\/\/\/\/\/\/\/\/\/\/\/\/\/\/\/\/\/\/\/\/\/\/\/\/\/\/\/\/\/\/\/\/\/\/\/\/\/\/\/\/\/\/\/\/\/\/\/\/\/\/\/\/\/\/\/\/\/\/\/\/\/\/\/\/\/\/\/\/\/\/\
Hey guys! Enjoy my video!


/\/\/\/\/\/\/\/\/\/\/\/\/\/\/\/\/\/\/\/\/\/\/\/\/\/\/\/\/\/\/\/\/\/\/\/\/\/\/\/\/\/\/\/\/\/\/\/\/\/\/\/\/\/\/\/\/\/\/\/\/\/\/\/\/\/\/\/\/\/\/\/\/\

I hope you enjoyed the video. Please like and comment. I'll see you in the next post!
/\/\/\/\/\/\/\/\/\/\/\/\/\/\/\/\/\/\/\/\/\/\/\/\/\/\/\/\/\/\/\/\/\/\/\/\/\/\/\/\/\/\/\/\/\/\/\/\/\/\/\/\/\/\/\/\/\/\/\/\/\/\/\/\/\/\/\/\/\/\/\/\/\

Thursday, August 4, 2016

Magnetism Tinker Lab : Part 2

/\/\/\/\/\/\/\/\/\/\/\/\/\/\/\/\/\/\/\/\/\/\/\/\/\/\/\/\/\/\/\/\/\/\/\/\/\/\/\/\/\/\/\/\/\/\/\/\/\/\/\/\/\/\/\/\/\/\/\/\/\/\/\/\/\/\/\/\/\/\/\/\/\
Hey again guys! Today I will be showing you my projects.

JUMPING TOY
~~~~~~~~~~~~~
This toy was pretty easy to make, I just needed....

- Tape
 - Small Toy
 - Bottle Cap
  - 2 Ring Magnets
 - Paper
First, I took the bottle cap, and taped a ring magnet on the inside of it. To make it bounce, I flipped the magnet to repel the magnet in the bottle cap, then I taped that magnet to the piece of paper. I completed the toy by taping the small toy to the bottle cap.


HOME-MADE COMPASS
~~~~~~~~~~~~~~~~~~~~~
This project was a bit challenging, but I was able to make it.

- Bowl of Water
- Cork
- Paper clip
- Ring Magnet

I took the paper clip and bent it straight. To make the paper clip work like a compass needle, I magnetized the paper clip with the ring magnet. Then I stuck it through the middle of the cork. It took a couple of tries, but I managed to get it through the cork. I gently put the cork in the bowl of water. When it stopped spinning in the bowl, it was pointing North/South. Then I used the magnet to see if the needle would follow the magnet.


WACKY PENDULUM
~~~~~~~~~~~~~~~~~~
This project is my favorite one. Here are the items I needed.....

- Pencil
- Tape
- String
- Straw
- Grey and Orange Foam (Small Hole)
- Ring Magnet
- Tinker Crate Box
- Scissors

To make the base, I flipped the tinker crate box to the side so the long sides are facing up. The pendulum needed a place to hang, so I taped the pencil on to the tinker crate box. The pendulum was pretty easy to make. I put the foam on the magnet, orange on the top and grey on the bottom. Then I cut the straw into a small piece, and slid it into the magnet. I hung it by slipping a piece of string into the straw, and tied it on by looping it around the string at the top. To finish the pendulum, I tied and taped it on the pencil. Another magnet that repelled the pendulum had to be on the surface so the pendulum would move in different directions. Here is the video of all of the magnet projects.


Do you know what a magnetic field looks like? If you were wondering what a ring magnets field was like, it would probably look like the picture below. When you feel the magnets attracting each other, that means they are within the magnetic field. The size may vary depending on the size and shape.


/\/\/\/\/\/\/\/\/\/\/\/\/\/\/\/\/\/\/\/\/\/\/\/\/\/\/\/\/\/\/\/\/\/\/\/\/\/\/\/\/\/\/\/\/\/\/\/\/\/\/\/\/\/\/\/\/\/\/\/\/\/\/\/\/\/\/\/\/\/\/\/\/\

I hope you enjoyed the post. In the next post I will have a new tinker crate to un-box. Bye!
/\/\/\/\/\/\/\/\/\/\/\/\/\/\/\/\/\/\/\/\/\/\/\/\/\/\/\/\/\/\/\/\/\/\/\/\/\/\/\/\/\/\/\/\/\/\/\/\/\/\/\/\/\/\/\/\/\/\/\/\/\/\/\/\/\/\/\/\/\/\/\/\/\

Monday, August 1, 2016

Magetism Tinker Lab : Part 1

/\/\/\/\/\/\/\/\/\/\/\/\/\/\/\/\/\/\/\/\/\/\/\/\/\/\/\/\/\/\/\/\/\/\/\/\/\/\/\/\/\/\/\/\/\/\/\/\/\/\/\/\/\/\/\/\/\/\/\/\/\/\/\/\/\/\/\/\/\/\/\/\/\
Hey guys. The camera broke and I have no un-boxing video. The items in the tinker crate were...

Ring Magnets X9
4 Piece Wood Frame Set
Notepad
Pencil
Pencil Sharpener
Acrylic Rods X2
Plastic Tube
Metal Cone
Magnet Guide
Mini Rubber bands X4
Sticky foam
Blueprints
Tinker-Zine

THE FIRST MAGNET, MAYBE?
~~~~~~~~~~~~~~~~~~~~~~~~~~~
Have you ever wondered where the first magnet came from? Once upon a time, there was a man named Magnus. One day, when he was keeping an eye on his sheep, his sandal stuck to a rock. Something was keeping the nails in his sandal attached to the rock. That something was magnetism. We don't know if it's true, but its a theory.

MAGNETS AND THEIR USES
~~~~~~~~~~~~~~~~~~~~~~~~~~
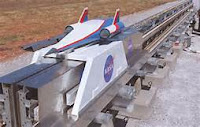
Magnet's have many uses. Magnets are used in refrigerators, DVD players, speakers, and more. Roller coasters use magnets too! That's right, roller coasters use magnetism to make the ride really fast. Older ones use gravity. There is a train that uses magnetic levitation (Maglev) to get around really fast. It's all the way in Shanghai. One is being built in Japan, but it won't be completed for another 11 years. NASA is making a rocket sled that goes into space. It has a track like a roller coaster, that uses maglev, and a sled with a shuttle attached to it! The track has to go up the side of a mountain to work. Small models are being tested today, but we don't know what the future has in store.
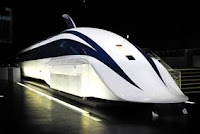
Maglev Train
Maglev Sled


 MAGLEV PENCIL HOLDER
~~~~~~~~~~~~~~~~~~~~~~~~
 Magnetic Levitation is important, but holding a pencil? It's possible with the items listed below.....

6 Ring Magnets
Wood Frame Pieces
Pencil
Pencil Sharpener
2 Acrylic Rods
Metal Cone
2 Mini Rubber Bands
Sticky Foam Rings and Pads(Grey and Orange)

 Before I could start on the main frame, I had to label the magnets first. When all of the magnets were stacked up, I put an orange foam ring with a large hole on top of the top magnet. Then I took a grey foam ring, took the top magnet off the stack, and put the ring on the bottom of that magnet. I repeated with the rest of the magnets, two of the magnets had foam rings with large holes, and the other ones had foam rings with small holes.

 When it was time to make the frame, I stuck the foam pads on to the large frame pieces. Then I completed my frame by attaching the large pieces to the long pieces that supported the frame. Taking the 4 magnets with small holes, I slid two magnets on each of the acrylic rods. I attached the rods to the large pieces and adjusted the rods evenly.

 The main part was done, but I needed the pencil tube done. I got the metal cone and slid the mini rubber bands on it so when the cone was slid into the end of the straw, it would be firm in place. To make the pencil tube float, I slid the magnets on the tube and positioned them with the magnet guide. All I needed to do was put the tube in between the rods and slide the pencil into the tube.


/\/\/\/\/\/\/\/\/\/\/\/\/\/\/\/\/\/\/\/\/\/\/\/\/\/\/\/\/\/\/\/\/\/\/\/\/\/\/\/\/\/\/\/\/\/\/\/\/\/\/\/\/\/\/\/\/\/\/\/\/\/\/\/\/\/\/\/\/\/\/\/\/\

I hope you enjoyed the post. If you did, please leave a like. I will see you in the next post. Bye guys!
/\/\/\/\/\/\/\/\/\/\/\/\/\/\/\/\/\/\/\/\/\/\/\/\/\/\/\/\/\/\/\/\/\/\/\/\/\/\/\/\/\/\/\/\/\/\/\/\/\/\/\/\/\/\/\/\/\/\/\/\/\/\/\/\/\/\/\/\/\/\/\/\/\

Thursday, July 21, 2016

Shake, Shake, IT'S AN EARTHQUAKE! : Part 2

/\/\/\/\/\/\/\/\/\/\/\/\/\/\/\/\/\/\/\/\/\/\/\/\/\/\/\/\/\/\/\/\/\/\/\/\/\/\/\/\/\/\/\/\/\/\/\/\/\/\/\/\/\/\/\/\/\/\/\/\/\/\/\/\/\/\/\/\/\/\/\/\/\
Hey guys! Today I have a new post. Please enjoy!

How to make an Earthquake-proof Building
~~~~~~~~~~~~~~~~~~~~~~~~~~~~~~~~~~
In order to have an earthquake-proof building, it needs to have strength, flexibility, and vibration control. To have a strong building, you'll need to have a strong material, like concrete. Concrete is a strong material, but it can shake apart if an earthquake were to come along. You would also need a flexible frame to have the building bend and sway with the earthquake. Steel is a very flexible metal, it's used in frames on buildings in earthquake zones. The building needs vibration control to be complete. Without the vibration, it would survive only a short time in an earthquake. The building needs to respond to the shaking and transfer most of the energy back to the ground and keep it from shaking a lot. Reducing the shaking of the building helps too. That's all you need to make an earthquake-proof building.

THE EARTHQUAKE DETECTOR
~~~~~~~~~~~~~~~~~~~~~~~~~~~~
Once upon a time, there was a polymath named Zhang Heng who lived in China nearly 2000 years ago. He invented the first ever earthquake detector, AKA the seismometer. It was made with a pendulum that swung in the direction of an earthquake. Wherever it swung, it would knock a ball out of one of the eight dragons mouths and into a toad's mouth below. Whichever ball dropped, that way was where the earthquake was. One day, he decided to take it into court. His rivals weren't very hopeful about the device. One time the device went off, but no one felt a thing. They all laughed at him! Later, someone came by and reported that an earthquake happened at the exact place the detector said it would.
/\/\/\/\/\/\/\/\/\/\/\/\/\/\/\/\/\/\/\/\/\/\/\/\/\/\/\/\/\/\/\/\/\/\/\/\/\/\/\/\/\/\/\/\/\/\/\/\/\/\/\/\/\/\/\/\/\/\/\/\/\/\/\/\/\/\/\/\/\/\/\/\/\

I hope enjoyed the post. Please like and comment. In the next post I will have a new unboxing video. Bye guys!
/\/\/\/\/\/\/\/\/\/\/\/\/\/\/\/\/\/\/\/\/\/\/\/\/\/\/\/\/\/\/\/\/\/\/\/\/\/\/\/\/\/\/\/\/\/\/\/\/\/\/\/\/\/\/\/\/\/\/\/\/\/\/\/\/\/\/\/\/\/\/\/\/\

Thursday, July 14, 2016

Shake, Shake, IT'S AN EARTHQUAKE! : Part 1

/\/\/\/\/\/\/\/\/\/\/\/\/\/\/\/\/\/\/\/\/\/\/\/\/\/\/\/\/\/\/\/\/\/\/\/\/\/\/\/\/\/\/\/\/\/\/\/\/\/\/\/\/\/\/\/\/\/\/\/\/\/\/\/\/\/\/\/\/\/\/\/\/\
 Hi guys! I have a new post today about my speed video for the shake table.


 Surviving an Earthquake- TAIPEI 101
~~~~~~~~~~~~~~~~~~~~~~~~~~~~~~
A building that survived many earthquakes and is the tallest building in Taiwan is called Taipei 101 (Center). It's over half a kilometer tall. The building is famous for the damper (Left) on the inside of the building. A damper is a ball that reduces vibrations in an earthquake. Without the damper, the building would shake apart. I made one out of washers for my building. It reminds me of a pendulum that moves the opposite way the building is moving. The damper is nearly 1.5 MILLION POUNDS!!!! There are also cables suspending it that are more than 3 inches thick, and pistons that support the bottom of the damper. The pistons also act as shock absorbers. The damper is so famous, it has it's own mascot, the damper baby! (Right)


/\/\/\/\/\/\/\/\/\/\/\/\/\/\/\/\/\/\/\/\/\/\/\/\/\/\/\/\/\/\/\/\/\/\/\/\/\/\/\/\/\/\/\/\/\/\/\/\/\/\/\/\/\/\/\/\/\/\/\/\/\/\/\/\/\/\/\/\/\/\/\/\/\

I hope you enjoyed the post. If you did, please like and comment. See you in the next post! Bye guys!
/\/\/\/\/\/\/\/\/\/\/\/\/\/\/\/\/\/\/\/\/\/\/\/\/\/\/\/\/\/\/\/\/\/\/\/\/\/\/\/\/\/\/\/\/\/\/\/\/\/\/\/\/\/\/\/\/\/\/\/\/\/\/\/\/\/\/\/\/\/\/\/\/\

Monday, July 11, 2016

13th Tinker Crate

/\/\/\/\/\/\/\/\/\/\/\/\/\/\/\/\/\/\/\/\/\/\/\/\/\/\/\/\/\/\/\/\/\/\/\/\/\/\/\/\/\/\/\/\/\/\/\/\/\/\/\/\/\/\/\/\/\/\/\/\/\/\/\/\/\/\/\/\/\/\/\/\/\
Hey guys! Today I have a new unboxing video. I hope you enjoy it!


/\/\/\/\/\/\/\/\/\/\/\/\/\/\/\/\/\/\/\/\/\/\/\/\/\/\/\/\/\/\/\/\/\/\/\/\/\/\/\/\/\/\/\/\/\/\/\/\/\/\/\/\/\/\/\/\/\/\/\/\/\/\/\/\/\/\/\/\/\/\/\/\/\

I hope you enjoyed the video. If you did, please leave this post a like and a comment. I will see you in the next post. Bye guys!
/\/\/\/\/\/\/\/\/\/\/\/\/\/\/\/\/\/\/\/\/\/\/\/\/\/\/\/\/\/\/\/\/\/\/\/\/\/\/\/\/\/\/\/\/\/\/\/\/\/\/\/\/\/\/\/\/\/\/\/\/\/\/\/\/\/\/\/\/\/\/\/\/\

Ready, Aim, FIRE!!! : Part 2

/\/\/\/\/\/\/\/\/\/\/\/\/\/\/\/\/\/\/\/\/\/\/\/\/\/\/\/\/\/\/\/\/\/\/\/\/\/\/\/\/\/\/\/\/\/\/\/\/\/\/\/\/\/\/\/\/\/\/\/\/\/\/\/\/\/\/\/\/\/\/\/\/\
Konichiwa! Today I will be talking about some of my activities I did.

DANCING PUPPET
~~~~~~~~~~~~~~~~~~
This activity has to do with levers. What I needed was....

- Cardboard (I got some from a soda box.)
- Markers (Black, White, Red, Purple.)
- Scissors
- Paper Fasteners
- String/Yarn ( I used thread.)
- Tape
- 4 Pennies

I cut out the shape of what I wanted my puppet to be. The puppet I wanted to make was the Marionette from the game Five Nights at Freddy's. I cut out the shape of the puppets body and head, and decorated it. Then I cut out the arms and legs out separately and colored them in. To make the arms and legs move on the body, I taped a piece of  to the side of the arm that connects the arm to the body. I did the same thing to the other arm and the legs. Taking the 4 pennies, I taped one to the end of each arm and leg. Then I poked a hole in between the string and the penny for each arm and leg. The hole had to be closer to the string than the penny. Then I connected the arms and legs to the body with a paper fastener. To make the puppet dance, I just had to pull the strings.

How does it work? The arms and legs are like a seesaw. AKA a first class lever. The fastener is the balancing point, the penny is the load, and the string is the effort to lift the penny up. Easy!
FLOATING PING-PONG BALL
~~~~~~~~~~~~~~~~~~~~~~~~~~~~
This project was really simple, all I needed was a hairdryer, and my ping-pong ball. I put my ping-pong ball on the hairdryer and switched it onto normal. There are two things that are making the ping-pong ball float up. It's gravity and the air coming from the hairdryer. Gravity pulls down the ball and the air pushes it up. That's air resistance at it's work. If the pull of gravity and the push of the air are equal, the ball floats!


MARSHMALLOW SHOOTER
~~~~~~~~~~~~~~~~~~~~~~~~~~~
Shooting a marshmallow? Are you sure that you can shoot a marshmallow? You can! With these items....
- 2 Toilet Paper Rolls
- 2 Rubber Bands (Thin)
- Pencil
- Duct Tape
- Hole Punch
- Scissors

I took my first toilet paper roll, and cut a straight line lengthwise down. Then I overlapped the roll to make it smaller, and taped it together. For the handle of the launcher, I punched two holes aligned in the top of the toilet paper roll, and slid the pencil in. Now that I'm done with the first roll, it's time for the second roll. Taking the scissors and the toilet paper roll, and cut two slits into the top of the roll. I did the same for the opposite side. Then I took the two rubber bands, and put one on each side. Taking tube 1, I slid it into the bottom of tube 2. To complete the launcher, all I had to do was slide the rubber bands on the pencil. I didn't have any marshmallows, but I did have mini ping-pong balls!
All I had to do was load a mini ping-pong ball into the launcher, pull back the pencil, and let go.

/\/\/\/\/\/\/\/\/\/\/\/\/\/\/\/\/\/\/\/\/\/\/\/\/\/\/\/\/\/\/\/\/\/\/\/\/\/\/\/\/\/\/\/\/\/\/\/\/\/\/\/\/\/\/\/\/\/\/\/\/\/\/\/\/\/\/\/\/\/\/\/\/\

I hope you enjoyed the post. If you did, please like and comment. In the next post I'll be unboxing a new tinker crate. Bye! <3
/\/\/\/\/\/\/\/\/\/\/\/\/\/\/\/\/\/\/\/\/\/\/\/\/\/\/\/\/\/\/\/\/\/\/\/\/\/\/\/\/\/\/\/\/\/\/\/\/\/\/\/\/\/\/\/\/\/\/\/\/\/\/\/\/\/\/\/\/\/\/\/\/\